DB zur Always On Availability Group hinzufügen – Anleitung

Hier wird gezeigt, wie man eine MS-SQL Datenbank zu einer (schon vorhandenen) Verfügbarkeitsgruppe hinzufügt.

Vollsicherung der neuen DBs erstellen

Die Datenbanken können erst dann zu Always On availability groups hinzugefügt werden, nachdem diese mit einem Full Backup (irgendwohin) gesichert wurden. Es ist dem SQL-Server egal mit welchem System oder wohin die DBs gesichert werden, Hauptsache, man hat eine Vollsicherung für die DBs durchgeführt.

Anderenfalls kann man die DBs nicht auswählen und als „Status“ wird

„Full backup is required“ angezeigt.

In den Details steht:

„This database lacks a full database backup. Before you can add this database to an availability group, you must perform a full database backup.“

This database lacks a full database backup. Before you can add this database to an availability group, you must perform a full database backup.

Man kann also eine vorhandene Backup-Lösung benutzen, oder DB-Dumps per SQL oder PowerShell erstellen.

Mit folgendem PowerShell-Skript kann man alle DBs sichern. Alle DB der SQL-Instanz, außer die in der „ExcludeList“ werden gesichert. D.h. die, die man sichern will, müssen aus der Exclude-Liste entfernt werden.

# SQL DBs Backup (DB-Dump im "Copy-Only"-Modus)
# ------------------------------------------------------------------
# Macht einen DB-Dump im "Copy-Only"-Modus und kann problemlos und im laufenden Betrieb ausgeführt werden.
# Ausführen im PS
# Zeilen mit BackupFolder, LogFile, SQLInstance UND ExcludeList anpassen.

function Write-LogFile
{
	param (
		$Message,
		[Parameter(Mandatory = $true)]
		[string]$LogFileLocation,
		[Parameter(ParameterSetName = 'WriteError')]
		[switch]$AsFailure,
		[Parameter(ParameterSetName = 'WriteInformation')]
		[switch]$AsInformation,
		[Parameter(ParameterSetName = 'WriteDebug')]
		[switch]$AsDebug
	)
	
	$TimeStampNow = Get-Date -Format 'yyyy-MM-dd HH:mm:ss'
	$ServerName = $ENV:COMPUTERNAME
	if ($AsFailure)
	{
		if ($Message)
		{
			$CustomErrorMessage = "$TimeStampNow `t ERROR `t $ServerName `t $Message"
			$CustomErrorMessage | Out-File -FilePath $LogFileLocation -Append
			Write-Host $CustomErrorMessage -ForegroundColor Red
		}
		else
		{
			$TMP_ErrorMessage = $GLOBAL:Error[0].Exception.Message
			$ErrorMessage = "$TimeStampNow `t ERROR `t $ServerName `t $($TMP_ErrorMessage)"
			$ErrorMessage | Out-File -FilePath $LogFileLocation -Append
			Write-Host $ErrorMessage -ForegroundColor Red
		}
	}
	elseif ($AsInformation)
	{
		$InformationMessage = "$TimeStampNow `t INFOR `t $ServerName `t $Message"
		$InformationMessage | Out-File -FilePath $LogFileLocation -Append
		Write-Output $InformationMessage
	}
	elseif ($AsDebug)
	{
		$DebugMessage = "$TimeStampNow `t DEBUG `t $ServerName `t $Message"
		$DebugMessage | Out-File -FilePath $LogFileLocation -Append
		Write-Output $DebugMessage
	}
}

# Anpassen !!!
# ================================

$BackupFolder = "B:\Backup"   #Net Share funktioniert auch
$LogFile = "$($BackupFolder)\$(Get-Date -Format 'yyyyMMdd-HHmm')_BackupLogfile.log"
$SQLInstance = "ServerName\Instance"

$ExcludeList = 'master', 'tempdb', 'model', 'msdb'

# Alle DBs ausgeben in SSMS: SELECT * FROM master.dbo.sysdatabases

# Zeitstempel im Dateinamen
$timeStamp = Get-Date -format yyyyMMdd
#$timeStamp = Get-Date -format yyyyMMdd-HHmmss

# ================================


[System.Reflection.Assembly]::LoadWithPartialName("Microsoft.SqlServer.SMO") | Out-Null
[System.Reflection.Assembly]::LoadWithPartialName("Microsoft.SqlServer.SmoExtended") | Out-Null

$srv = New-Object ("Microsoft.SqlServer.Management.Smo.Server") $SQLInstance
$srv.ConnectionContext.StatementTimeout = 0
$dbs = New-Object Microsoft.SqlServer.Management.Smo.Database
$dbs = $srv.Databases

Write-LogFile -LogFileLocation $LogFile -AsInformation -Message "Starting SQL Backup..."
Write-LogFile -LogFileLocation $LogFile -AsInformation -Message "   loaded $($dbs.count) databases"
Write-LogFile -LogFileLocation $LogFile -AsInformation -Message "   Excluding the following databases:"
Write-LogFile -LogFileLocation $LogFile -AsInformation -Message "   $($ExcludeList)"
Write-LogFile -LogFileLocation $LogFile -AsInformation -Message "   Saving backups to $($BackupFolder)"


$counter = 0
$DBCount = $dbs.count
foreach ($Database in $dbs)
{
	$counter++
	Write-Progress -Activity 'Backup' -Status "[$($Counter)/$($DBCount)] - $($Database.name)" -PercentComplete ((100/$DBCount)*$counter)
	if ($ExcludeList -contains $Database.name)
	{
		Write-LogFile -LogFileLocation $LogFile -AsInformation -Message "Database $($Database.name) is in the exclude list and will be skipped"
		continue;
	}
		
	$bk = New-Object ("Microsoft.SqlServer.Management.Smo.Backup")
	$bk.Action = [Microsoft.SqlServer.Management.Smo.BackupActionType]::Database
	$bk.BackupSetName = $Database.Name + "_backup_" + $timeStamp
	$bk.Database = $Database.Name
	$bk.CopyOnly = $true
	$bk.CompressionOption = 1
	$bk.MediaDescription = "Disk"
	$bk.Devices.AddDevice($BackupFolder + "\" + $Database.Name + "_" + $timeStamp + ".bak" , "File")
	
	TRY
	{
		Write-LogFile -LogFileLocation $LogFile -AsInformation -Message "Starting Backup of database $($Database.name) with estimated DB size of $([Math]::Round($Database.Size,2))MB"
		Write-LogFile -LogFileLocation $LogFile -AsInformation -Message "   Destination path: $($BackupFolder + '\' + $Database.Name + '_' + $timeStamp + '.bak')"
		$bk.SqlBackup($srv)
		Write-LogFile -LogFileLocation $LogFile -AsInformation -Message "   Successfully finished backup of database $($Database.name)" 
	}
	CATCH
	{
		Write-LogFile -LogFileLocation $LogFile -AsFailure -Message "$($Database.Name) backup failed!" 
		Write-LogFile -LogFileLocation $LogFile -AsFailure -Message "$($_.Exception.Message)" 
		Write-LogFile -LogFileLocation $LogFile -AsFailure
	}
}

Datenbanken hinzufügen

Wizard in SSMS starten

  1. SSMS (SQL Server Management Studio) auf dem primären Cluster-Knoten starten.
  2. Sich mit der SQL Instanz verbinden.
  3. Im Baum auf der linken Seite navigieren:
    1. Instanz > Always On High Availability > Availability Groups
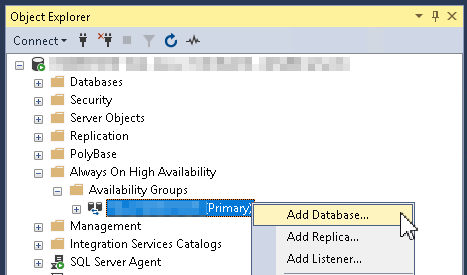
      1. Rechte Maustaste auf den Namen der Gruppe. Hier „HA_GROUP (Primary)“
        1. Add Database…

SSMS - Always On High Availability - Availability Groups - Add Database

Wizard durchgehen

  1. Tab „Introduction“
    1. Next
  2. Tab „Select Databases“
    1. DBs auswählen, die hinzugefügt werden sollen
    2. Next
  3. Tab „Connect to Replicas“
    1. Button „Connect…“
    2. Im Fenster „Connect to Server“ noch einmal „Connect“ (mit den aktuellen Zugangsdaten).
    3. Next
  4. Tab „Select Data Synchronization“
    1. Option „Automatic seeding“ auswählen.
    2. Next
  5. Tab „Validation“
    1. Alle vier Haken sind grün und als Result steht überall „Success“
    2. Next
  6. Tab „Summary“
    1. Aufgelisteten DBs, die zur HA hinzugefügt werden, überprüfen.
    2. Button „Finish“
  7. Tab „Results“
    1. Meldung: „The wizard completed successfully“
    2. Result: Success
    3. Button „Close“

Prüfen & Warten

Dashboard öffnen

Um den Status besser sehen zu können, kann man das Dashboard öffnen. Dieses aktualisiert sich normalerweise automatisch.

  1. Im Baum auf der linken Seite navigieren:
    1. Instanz > Always On High Availability > Availability Groups
      1. Rechte Maustaste auf den Namen der Gruppe. Hier „HA_GROUP (Primary)“
        1. Show Dashboard…

Status beobachten

  • Ganz oben links ist noch ein roter Kreis mit einem ❌
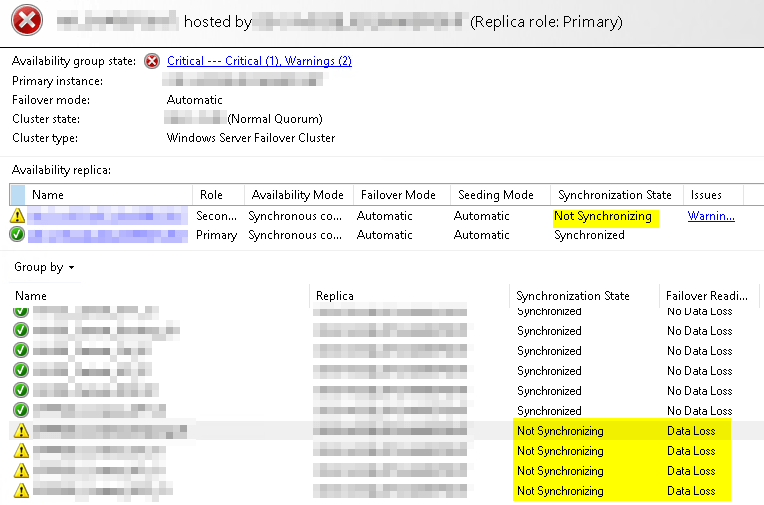
    • Availability group state: Critical (1), Warnings (2)
    • Details im Link
      • ❌Availability group is not ready for automatic failover.
      • ⚠ Some availability replicas are not synchronizing data.
      • ⚠ Some synchronous replicas are not synchronized.
  • Availability replica:
    • ⚠ Die „Role“ Secondary steht mit „Synchronization State“ auf „Not Synchronizing“ und zeigt in der Spalte „Issues“ ein „Warning“
  • Einzelne neue (noch nicht synchronisierte) DBs stehen mit dem gelben Dreieck und Ausrufezeichen ⚠
    • Spalte Synchronization steht steht auf „Not Synchronizing“
    • Spalte „Failover Readi…“ steht auf „Data Loss“. In Details steht:
      • „Data synchronization state of availability database is not healthy.“
      • „Secondary database is not joined.“
        SSMS - Availability group state: Critical (1), Warnings (2)
    • Nach und nach kriegen die neuen DBs den grünen Kreis mit dem Häkchen ✅ und sind repliziert und in HA eingebunden.
 

Restore-SPSite : No content databases in the web application were available to store your site collection

Problem

Restore-SPSite : Der Vorgang, den Sie auszuführen möchten, kann nicht erfolgreich abgeschlossen werden. Es waren keine Inhaltsdatenbanken in der Webanwendung verfügbar, um Ihre Websitesammlung zu speichern.

Restore-SPSite : Der Vorgang, den Sie auszuführen möchten, kann nicht erfolgreich abgeschlossen werden. Es waren keine Inhaltsdatenbanken in der Webanwendung verfügbar, um Ihre Websitesammlung zu speichern. Die vorhandenen Inhaltsdatenbanken haben möglicherweise die maximale Anzahl von Websitesammlungen erreicht, wurden als schreibgeschützt festgelegt, sind offline oder enthalten bereits eine Kopie dieser Websitesammlung. Erstellen Sie eine andere Inhaltsdatenbank für die Webanwendung, und versuchen Sie den Vorgang dann erneut.

Restore-SPSite : The operation that you are attempting to perform cannot be completed successfully. No content databases in the web application were available to store your site collection.

Restore-SPSite : The operation that you are attempting to perform cannot be completed successfully. No content databases in the web application were available to store your site collection. The existing content databases may have reached the maximum number of site collections, or be set to read-only, or be offline, or may already contain a copy of this site collection. Create another content database for the Web application and then try the operation again.

Restore-SPSite : No content databases in the web application were available to store your site collection weiterlesen

DocAve – Out of Place Restore Failed – Error: Failed to open connection

DocAve – Platform Out of Place Restore Failed – Error: Failed to open connection

Restore Type: Out of Place – Status: Failed

Restore Job bricht nach 6% ab mit dem Status Failed.

An error occurred while grouping the selected nodes. Error: Failed to open connection

Job-Details:

An error occurred while grouping the selected nodes. Error: Failed to open connection. Server: <SQL-Server>\<SQL-Instanzname ohne Port>, Database: master, User: <DocAve-Agent-Username>, Netzwerkbezogener oder instanzspezifischer Fehler beim Herstellen einer Verbindung mit SQL Server. Der Server wurde nicht gefunden, oder auf ihn kann nicht zugegriffen werden. Überprüfen Sie, ob der Instanzname richtig ist und ob SQL Server Remoteverbindungen zulässt. (provider: SQL Network Interfaces, error: 26 – Fehler beim Bestimmen des angegebenen Servers/der angegebenen Instanz)

DocAve – Out of Place Restore Failed – Error: Failed to open connection weiterlesen

DocAve – There is no agent installed in the server x or the Agent service in the server x is down – Error

DocAve – There is no agent installed in the server <ServerName> or the Agent service in the server <ServerName> is down – Error

Die DocAve-Sicherung vom Backup Type „Full Backup“ endet immer mit dem Status „Finished with Exception„.

In den Details des Backup-Jobs gibt es Zeile(n) mit dem Status „Failed“ und dem Comment:

There is no agent installed in the server <ServerName> or the Agent service in the server <ServerName> is down

DocAve – There is no agent installed in the server x or the Agent service in the server x is down – Error weiterlesen

DocAve Backup Retention Rule funktioniert nicht – Tipp

Problem

DocAve Backup Retention Rule ohne Funktion

Trotz eingeschalteter Retention Rule kopiert oder verschiebt DocAve die Backups nicht auf das Ziellaufwerk. DocAve Backup Retention Rule funktioniert nicht – Tipp weiterlesen

TSM Tivoli – BackupComplete() failed with error VSS_E_BAD_STATE. 0X80042301

Problem

BackupComplete() failed with error VSS_E_BAD_STATE. 0X80042301

Die TSM (Tivooli) Backups scheitern mit der Fehlermeldung:

ANS1512E Scheduled event 'BACKUP_22' failed.  Return code = 12.
ANS5250E An unexpected error was encountered.
   TSM function name : BackupComplete()
   TSM function      : 'BackupComplete() failed with error VSS_E_BAD_STATE. 0X80042301'
   TSM return code   : -2147212543
   TSM file          : ..\..\common\winnt\asrutil.cpp (2500)
ANS1468E Backing up Automated System Recovery (ASR) files failed.  No files will be backed up.

im Log „C:\Program Files\Tivoli\TSM\baclient\dsmerror.log“

Event-ID: 4112 – Quelle TsmVssPlugin

In der Ereignisanzeige (Event Viewer) findet man eventuell folgende Einträge mit der Event-ID: 4112:

VSS processing encountered error 'VSS_E_INSUFFICIENT_STORAGE' in the Volume Shadow Copy API 'QueryStatus:DoSnapshotSet'.

For more information, see the IBM Tivoli Storage Manager client error log.

TSM Tivoli – BackupComplete() failed with error VSS_E_BAD_STATE. 0X80042301 weiterlesen

TSM Tivoli – System Writers ’system writer‘ do not exist

Problem

System Writers ’system writer‘ do not exist

Das TSM (Tivoli) Server-Backup scheitert. In der Logdatei dsmerror.log findet man folgenden Eintrag:

ANS1512E Scheduled event 'BACKUP_22' failed.  Return code = 12.
ANS1577I The Windows console event handler received a 'Ctrl-C' console event.
ANS1705E System Writers 'system writer'  do not exist.

TSM Tivoli – System Writers ’system writer‘ do not exist weiterlesen

DocAve Agent Temporary Buffer – Temp Ordner anpassen

In diesem kurzen Tipp werde ich beschreiben, wie man den DocAve Agent Temporary Buffer (Temp Ordner) anpassen kann.

Standardmäßig benutzt DocAve Agent nämlich den Temp-Ordner (Temporary Buffer) auf der lokalen Systemfestplatte. Das könnte später zu Problemen führen, wenn die Systemfestplatte klein und nur für das Betriebssystem gedacht ist.

DocAve Agent Temporary Buffer – Temp Ordner anpassen weiterlesen

DocAve – Cannot upload the selected update package

Problem

Cannot upload the selected update package

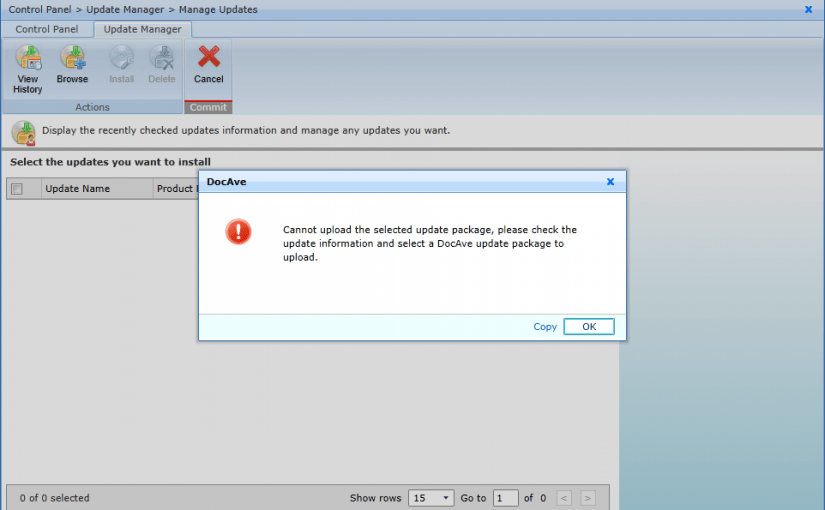
Cannot upload the selected update package, please check the update information and select a DocAve update package to upload.
DocAve – Cannot upload the selected update package weiterlesen

Von DocAve erstellte Datenbank wird wiederhergestellt…

Problem

Die von DocAve erstellte Datenbank wird wiederhergestellt…

Im SSMS sieht man eine (von DocAve erstellte), temporäre Datenbank mit der Meldung (Wird wiederhergestellt…) bzw. (Restoring…) bzw. (Standby / Schreibgeschützt) bzw. (Wiederherstellung steht aus)

The job has timed out. The connection between the Control Service and Media Service or Agent are disconnected

Im DocAve Job Monitor in den Job Details unter „Comment“ zu finden.

Failed to verify the backup for the current node. Error: Failed to restore node ‚<Farm>\Microsoft SharePoint Foundation-Webanwendung\<WebAppName>\<SP-DB-Name>.full.data‘, details: Der Prozess kann nicht auf die Datei „<Pfad>\MSSQL\DATA\SAFEDATA\<SP-DB-Name>.mdf“ zugreifen, da sie von einem anderen Prozess verwendet wird.

Wird in den Details eines, mit dem Status „Finished with Exception“ beendeten Platform Maintenance Jobs im DocAve Job-Monitor angezeigt.

Details

Beschreibung

Im SSMS sieht man eventuell Folgendes (muss nicht alles vorhanden sein):

  • Eine (von DocAve erstellte), temporäre Datenbank mit dem grünen, nach oben zeigenden Pfeil als Icon und dem Namen
    <SP-DB-Name>_PM<GUID>
    (Wird wiederhergestellt…) bzw. (Restoring…)
  • Graue Datenbank-Icons mit dem Text (Standby / Schreibgeschützt)
  • Normale gelbe Datenbank-Icons mit dem Status (Wiederherstellung steht aus)

In den Eigenschaften der DB findet man den Namen, den Status (z.B. „Wird wiederhergestellt“) und wann die DB erstellt wurde. Die Angaben zu den eigentlichen SQL-Files findet man hier nicht.

Datenbankeigenschaften - Datenbank wird wiederhergestellt

PM im Namen steht in diesem Fall für Platform Maintenance
Manager und führt im DocAve Backup-Plan aktivierten Wartungsjobs wie „Verify DB Backup Data“, „Build Index“ etc. aus.

Auf dem SQL-Server im <Pfad>\MSSQL\DATA\SAFEDATA findet man die zu der temporären DB gehörenden Dateien <SP-DB-Name>.mdf und <SP-DB-Name>.ldf
Das Änderungsdatum der Dateien entspricht dem Datum aus den DB-Eigenschaften.

Im DocAve Job-Monitor findet man in dem Fall einen unfertigen Platform-Maintenance-Job mit folgenden Angaben:

  • Maintenance Job ID: PM<JahrMonatTagZeit>
  • Maintenance Action: Verify database backup data
  • Status: Failed
  • Comment: The job has timed out. The connection between the Control Service and Media Service or Agent are disconnected

Von DocAve erstellte Datenbank wird wiederhergestellt… weiterlesen