Hier wird gezeigt, wie man eine MS-SQL Datenbank zu einer (schon vorhandenen) Verfügbarkeitsgruppe hinzufügt.
Vollsicherung der neuen DBs erstellen
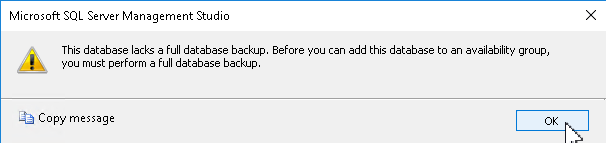
Die Datenbanken können erst dann zu Always On availability groups hinzugefügt werden, nachdem diese mit einem Full Backup (irgendwohin) gesichert wurden. Es ist dem SQL-Server egal mit welchem System oder wohin die DBs gesichert werden, Hauptsache, man hat eine Vollsicherung für die DBs durchgeführt.
Anderenfalls kann man die DBs nicht auswählen und als „Status“ wird
„Full backup is required“ angezeigt.
In den Details steht:
„This database lacks a full database backup. Before you can add this database to an availability group, you must perform a full database backup.“
Man kann also eine vorhandene Backup-Lösung benutzen, oder DB-Dumps per SQL oder PowerShell erstellen.
Mit folgendem PowerShell-Skript kann man alle DBs sichern. Alle DB der SQL-Instanz, außer die in der „ExcludeList“ werden gesichert. D.h. die, die man sichern will, müssen aus der Exclude-Liste entfernt werden.
# SQL DBs Backup (DB-Dump im "Copy-Only"-Modus)
# ------------------------------------------------------------------
# Macht einen DB-Dump im "Copy-Only"-Modus und kann problemlos und im laufenden Betrieb ausgeführt werden.
# Ausführen im PS
# Zeilen mit BackupFolder, LogFile, SQLInstance UND ExcludeList anpassen.

function Write-LogFile
{
	param (
		$Message,
		[Parameter(Mandatory = $true)]
		[string]$LogFileLocation,
		[Parameter(ParameterSetName = 'WriteError')]
		[switch]$AsFailure,
		[Parameter(ParameterSetName = 'WriteInformation')]
		[switch]$AsInformation,
		[Parameter(ParameterSetName = 'WriteDebug')]
		[switch]$AsDebug
	)

	$TimeStampNow = Get-Date -Format 'yyyy-MM-dd HH:mm:ss'
	$ServerName = $ENV:COMPUTERNAME
	if ($AsFailure)
	{
		if ($Message)
		{
			$CustomErrorMessage = "$TimeStampNow `t ERROR `t $ServerName `t $Message"
			$CustomErrorMessage | Out-File -FilePath $LogFileLocation -Append
			Write-Host $CustomErrorMessage -ForegroundColor Red
		}
		else
		{
			$TMP_ErrorMessage = $GLOBAL:Error[0].Exception.Message
			$ErrorMessage = "$TimeStampNow `t ERROR `t $ServerName `t $($TMP_ErrorMessage)"
			$ErrorMessage | Out-File -FilePath $LogFileLocation -Append
			Write-Host $ErrorMessage -ForegroundColor Red
		}
	}
	elseif ($AsInformation)
	{
		$InformationMessage = "$TimeStampNow `t INFOR `t $ServerName `t $Message"
		$InformationMessage | Out-File -FilePath $LogFileLocation -Append
		Write-Output $InformationMessage
	}
	elseif ($AsDebug)
	{
		$DebugMessage = "$TimeStampNow `t DEBUG `t $ServerName `t $Message"
		$DebugMessage | Out-File -FilePath $LogFileLocation -Append
		Write-Output $DebugMessage
	}
}

# Anpassen !!!
# ================================

$BackupFolder = "B:\Backup"   #Net Share funktioniert auch
$LogFile = "$($BackupFolder)\$(Get-Date -Format 'yyyyMMdd-HHmm')_BackupLogfile.log"
$SQLInstance = "ServerName\Instance"

$ExcludeList = 'master', 'tempdb', 'model', 'msdb'

# Alle DBs ausgeben in SSMS: SELECT * FROM master.dbo.sysdatabases

# Zeitstempel im Dateinamen
$timeStamp = Get-Date -format yyyyMMdd
#$timeStamp = Get-Date -format yyyyMMdd-HHmmss

# ================================


[System.Reflection.Assembly]::LoadWithPartialName("Microsoft.SqlServer.SMO") | Out-Null
[System.Reflection.Assembly]::LoadWithPartialName("Microsoft.SqlServer.SmoExtended") | Out-Null

$srv = New-Object ("Microsoft.SqlServer.Management.Smo.Server") $SQLInstance
$srv.ConnectionContext.StatementTimeout = 0
$dbs = New-Object Microsoft.SqlServer.Management.Smo.Database
$dbs = $srv.Databases

Write-LogFile -LogFileLocation $LogFile -AsInformation -Message "Starting SQL Backup..."
Write-LogFile -LogFileLocation $LogFile -AsInformation -Message "   loaded $($dbs.count) databases"
Write-LogFile -LogFileLocation $LogFile -AsInformation -Message "   Excluding the following databases:"
Write-LogFile -LogFileLocation $LogFile -AsInformation -Message "   $($ExcludeList)"
Write-LogFile -LogFileLocation $LogFile -AsInformation -Message "   Saving backups to $($BackupFolder)"


$counter = 0
$DBCount = $dbs.count
foreach ($Database in $dbs)
{
	$counter++
	Write-Progress -Activity 'Backup' -Status "[$($Counter)/$($DBCount)] - $($Database.name)" -PercentComplete ((100/$DBCount)*$counter)
	if ($ExcludeList -contains $Database.name)
	{
		Write-LogFile -LogFileLocation $LogFile -AsInformation -Message "Database $($Database.name) is in the exclude list and will be skipped"
		continue;
	}

	$bk = New-Object ("Microsoft.SqlServer.Management.Smo.Backup")
	$bk.Action = [Microsoft.SqlServer.Management.Smo.BackupActionType]::Database
	$bk.BackupSetName = $Database.Name + "_backup_" + $timeStamp
	$bk.Database = $Database.Name
	$bk.CopyOnly = $true
	$bk.CompressionOption = 1
	$bk.MediaDescription = "Disk"
	$bk.Devices.AddDevice($BackupFolder + "\" + $Database.Name + "_" + $timeStamp + ".bak" , "File")

	TRY
	{
		Write-LogFile -LogFileLocation $LogFile -AsInformation -Message "Starting Backup of database $($Database.name) with estimated DB size of $([Math]::Round($Database.Size,2))MB"
		Write-LogFile -LogFileLocation $LogFile -AsInformation -Message "   Destination path: $($BackupFolder + '\' + $Database.Name + '_' + $timeStamp + '.bak')"
		$bk.SqlBackup($srv)
		Write-LogFile -LogFileLocation $LogFile -AsInformation -Message "   Successfully finished backup of database $($Database.name)"
	}
	CATCH
	{
		Write-LogFile -LogFileLocation $LogFile -AsFailure -Message "$($Database.Name) backup failed!"
		Write-LogFile -LogFileLocation $LogFile -AsFailure -Message "$($_.Exception.Message)"
		Write-LogFile -LogFileLocation $LogFile -AsFailure
	}
}
Datenbanken hinzufügen
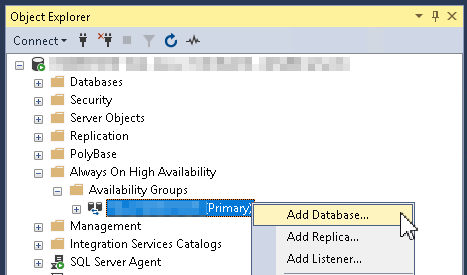
Wizard in SSMS starten
- SSMS (SQL Server Management Studio) auf dem primären Cluster-Knoten starten.
- Sich mit der SQL Instanz verbinden.
- Im Baum auf der linken Seite navigieren:
- Instanz > Always On High Availability > Availability Groups
- Rechte Maustaste auf den Namen der Gruppe. Hier „HA_GROUP (Primary)“
- Add Database…
- Rechte Maustaste auf den Namen der Gruppe. Hier „HA_GROUP (Primary)“
- Instanz > Always On High Availability > Availability Groups
Wizard durchgehen
- Tab „Introduction“
- Next
- Tab „Select Databases“
- DBs auswählen, die hinzugefügt werden sollen
- Next
- Tab „Connect to Replicas“
- Button „Connect…“
- Im Fenster „Connect to Server“ noch einmal „Connect“ (mit den aktuellen Zugangsdaten).
- Next
- Tab „Select Data Synchronization“
- Option „Automatic seeding“ auswählen.
- Next
- Tab „Validation“
- Alle vier Haken sind grün und als Result steht überall „Success“
- Next
- Tab „Summary“
- Aufgelisteten DBs, die zur HA hinzugefügt werden, überprüfen.
- Button „Finish“
- Tab „Results“
- Meldung: „The wizard completed successfully“
- Result: Success
- Button „Close“
Prüfen & Warten
Dashboard öffnen
Um den Status besser sehen zu können, kann man das Dashboard öffnen. Dieses aktualisiert sich normalerweise automatisch.
- Im Baum auf der linken Seite navigieren:
- Instanz > Always On High Availability > Availability Groups
- Rechte Maustaste auf den Namen der Gruppe. Hier „HA_GROUP (Primary)“
- Show Dashboard…
- Rechte Maustaste auf den Namen der Gruppe. Hier „HA_GROUP (Primary)“
- Instanz > Always On High Availability > Availability Groups
Status beobachten
- Ganz oben links ist noch ein roter Kreis mit einem ❌
- Availability group state: Critical (1), Warnings (2)
- Details im Link
- ❌Availability group is not ready for automatic failover.
- ⚠ Some availability replicas are not synchronizing data.
- ⚠ Some synchronous replicas are not synchronized.
- Availability replica:
- ⚠ Die „Role“ Secondary steht mit „Synchronization State“ auf „Not Synchronizing“ und zeigt in der Spalte „Issues“ ein „Warning“
- Einzelne neue (noch nicht synchronisierte) DBs stehen mit dem gelben Dreieck und Ausrufezeichen ⚠
- Spalte Synchronization steht steht auf „Not Synchronizing“
- Spalte „Failover Readi…“ steht auf „Data Loss“. In Details steht:
- „Data synchronization state of availability database is not healthy.“
- „Secondary database is not joined.“
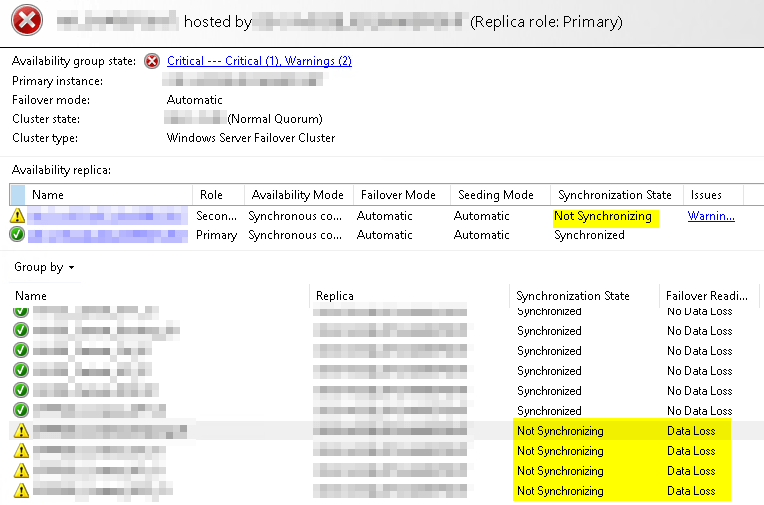
- Nach und nach kriegen die neuen DBs den grünen Kreis mit dem Häkchen ✅ und sind repliziert und in HA eingebunden.